BIM Integrator Pro (COBie Manager)
This screen links BIM data (3D building models from Revit) with COBie data (an Excel spreadsheet of asset data) and imports both into the system at once — every asset ends up with both its real location inside the 3D model and its full data at the same time.
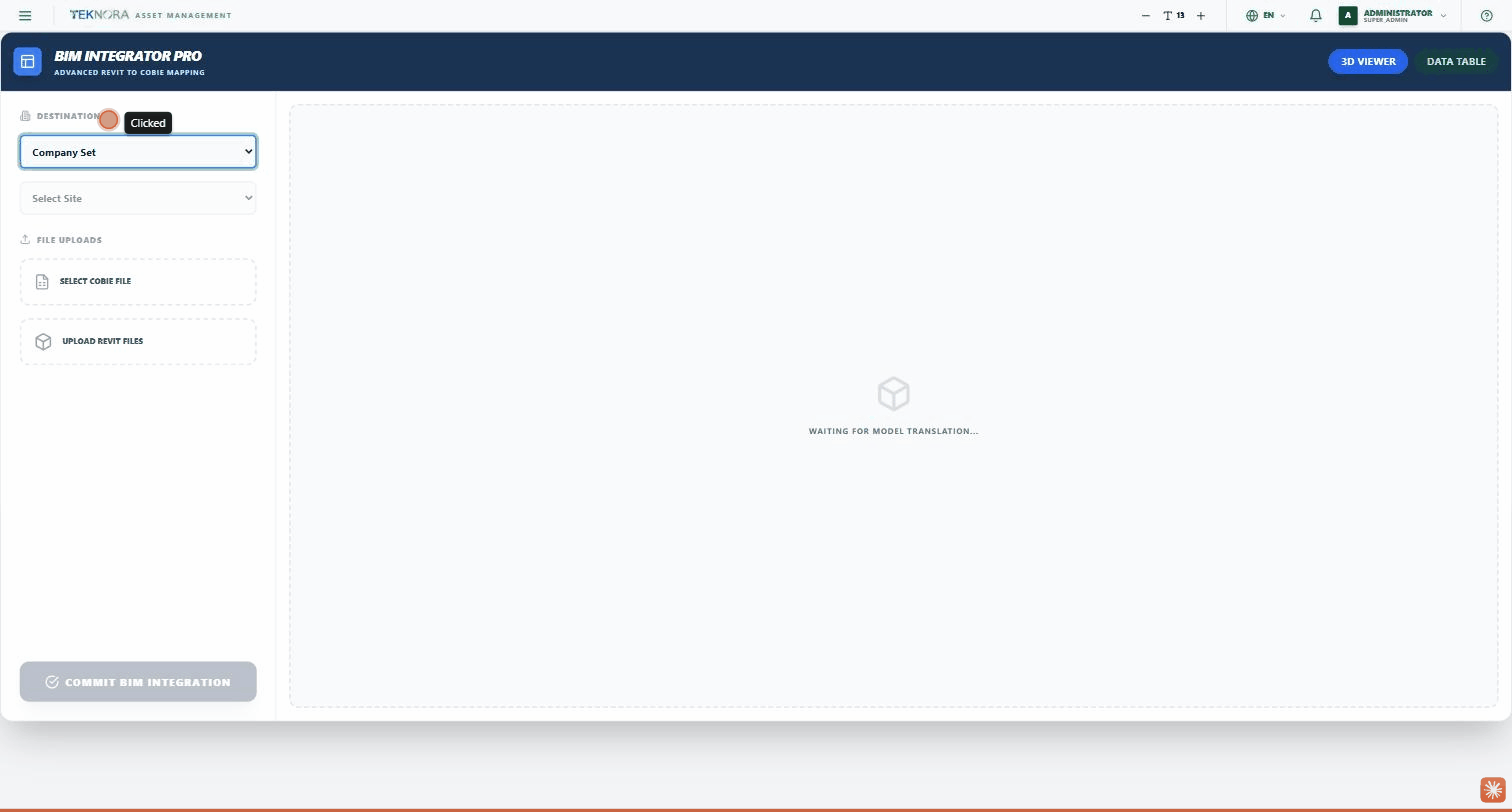
Toolbar
- Tool title: "BIM INTEGRATOR PRO - ADVANCED REVIT TO COBIE MAPPING".
- View switch: two tabs — 3D VIEWER (the 3D model viewer) and DATA TABLE (the COBie data table).
Sidebar (Destination & Uploads)
Destination
- Company Set: pick the organization to import data into.
- Select Site: becomes enabled once an organization is chosen, and lists its sites.
File Uploads
- Select COBie File: an Excel file (.xlsx) containing asset data (name, location, description...).
- Upload Revit Files: one or more .rvt files — automatically converted into a viewable 3D model (via the Autodesk service).
After uploading Revit files, a "Preview Models" list appears — click any model in it to view it in the 3D Viewer tab.
3D Viewer
Displays the BIM model once conversion is done (while still converting, it shows "WAITING FOR MODEL TRANSLATION..."). The view is fully interactive (zoom/pan/rotate) just like any professional BIM software.
Data Table
Once you upload a COBie file, the table shows a preview of every row: asset name, location (Space), and description — so you can confirm the data is correct before the actual import.
Commit BIM Integration
The button below the sidebar — only enabled once at least a COBie file is selected. Clicking it imports all the asset data (and 3D model links, if present) into the selected organization and site.
Practical Steps
1. Set the destination
Choose the organization, then the site you want to import data into.
2. Upload the COBie file
Click SELECT COBIE FILE and upload the Excel file — the DATA TABLE tab opens automatically so you can review the data.
3. (Optional) Upload Revit models
Click UPLOAD REVIT FILES if you have 3D models linked to the same project.
4. Review and commit
Review the data in the DATA TABLE tab and the models in the 3D VIEWER tab, then click COMMIT BIM INTEGRATION.
Before committing
The import actually adds new records to the database — review the preview data carefully before clicking COMMIT, especially the selected organization and site.