Workflow Logic Designer
The Workflow Logic Designer lets you draw approval logic by drag-and-drop — no code required — using nodes connected by arrows, just like any professional diagramming tool.
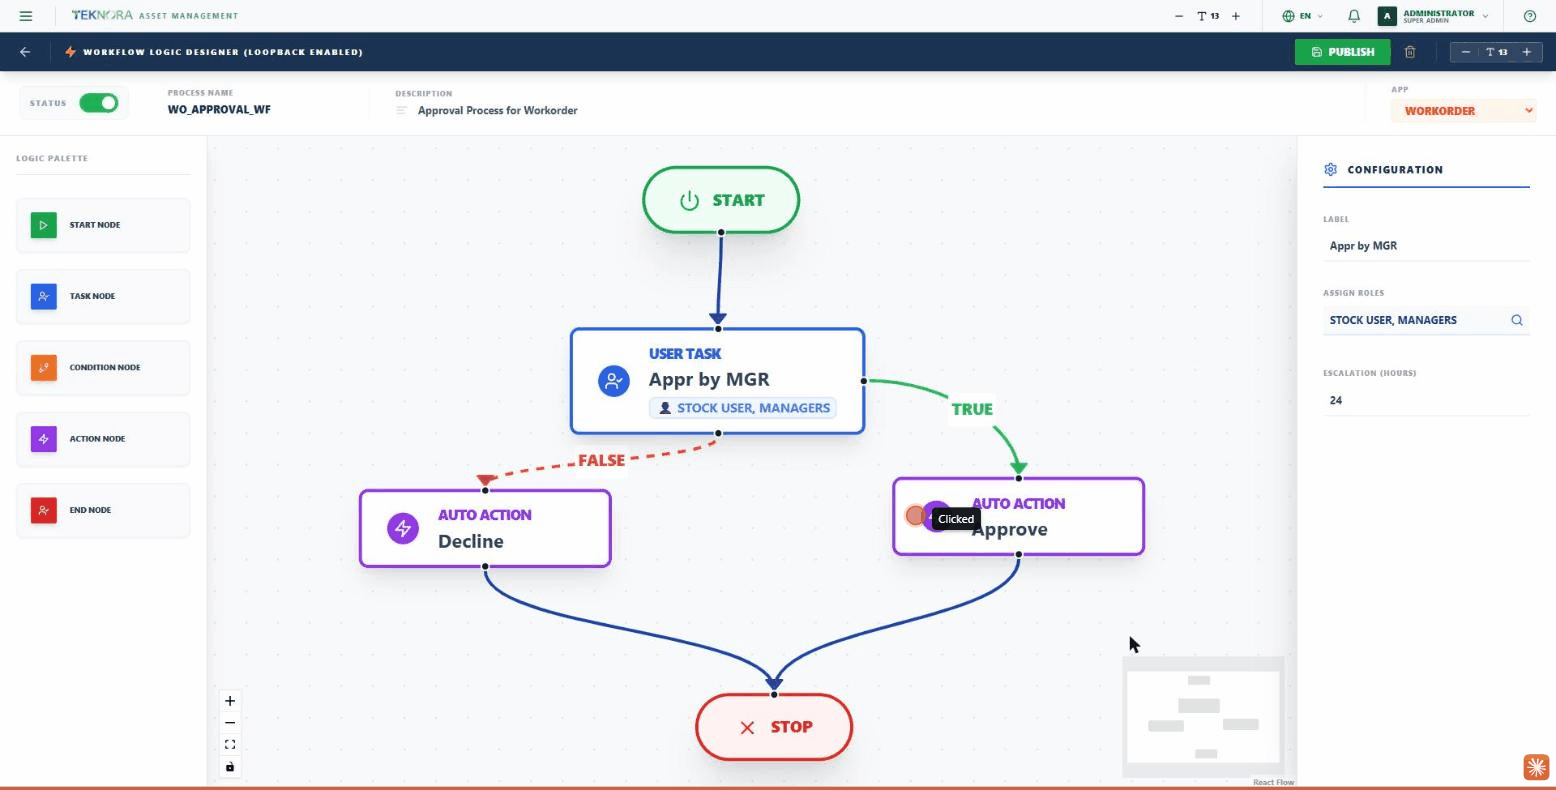
Toolbar
| Button | Function |
|---|---|
| Back (arrow) | Returns you to the Workflow Engine |
| Publish | Publishes the process and makes it active |
| Trash icon | Deletes the entire process |
| Font size controls | Zoom the screen's text in/out |
Metadata Header
- Status: a switch to enable/disable the whole process.
- Process Name: the process's unique code.
- Description: a short explanation.
- App: the module this process controls (Work Order, Purchase, Purchase Request, Material Request, Service Request, Incident, PO).
Logic Palette — Node Types
Click any type in the left palette to add it to the canvas:
- Start Node: the process's starting point (there must be exactly one).
- Task Node (user task): a human approval step — you assign the roles (Assign Roles) responsible for the decision, and an escalation timeout (Escalation Hours) in case no one responds in time. It has two outgoing paths: TRUE (approved) and FALSE (rejected).
- Condition Node (decision): an automatic logical branch based on a condition, also with TRUE and FALSE outputs.
- Action Node (automated action): an automatic execution step — such as running a script (Action Script) or automatically changing the record's status — with no human involvement.
- End Node: the process's end point.
Configuration Panel
Clicking any node opens its configuration panel on the right:
- All nodes: a Label.
- Task Node: Assign Roles — search for one or more roles — and the escalation timeout in hours.
- Action Node: the Action Script code to run, and the type of post-action (such as a status change).
- Condition Node: the logical condition that determines the TRUE/FALSE branch.
Practical Steps
1. Create a new process
From the Workflow Engine, click NEW PROCESS, set the process name and the linked app.
2. Build the flow
Drag a Start node, connect it to a Task or Condition node, and keep building until you reach an End node.
3. Configure each node
Click each node and fill in its settings from the right-hand panel (roles, script, condition).
4. Publish
Click Publish so the process becomes active and starts controlling real records.
Before publishing
Make sure every Task node has assigned roles — an approval node with no roles won't know who to route the request to.
Back to: Workflow Engine ←