PM Details
The PM Details screen defines how, when, and on which asset a maintenance work order is automatically generated — whether on a fixed schedule, based on meter readings, or through a sequence of rotating job plans.
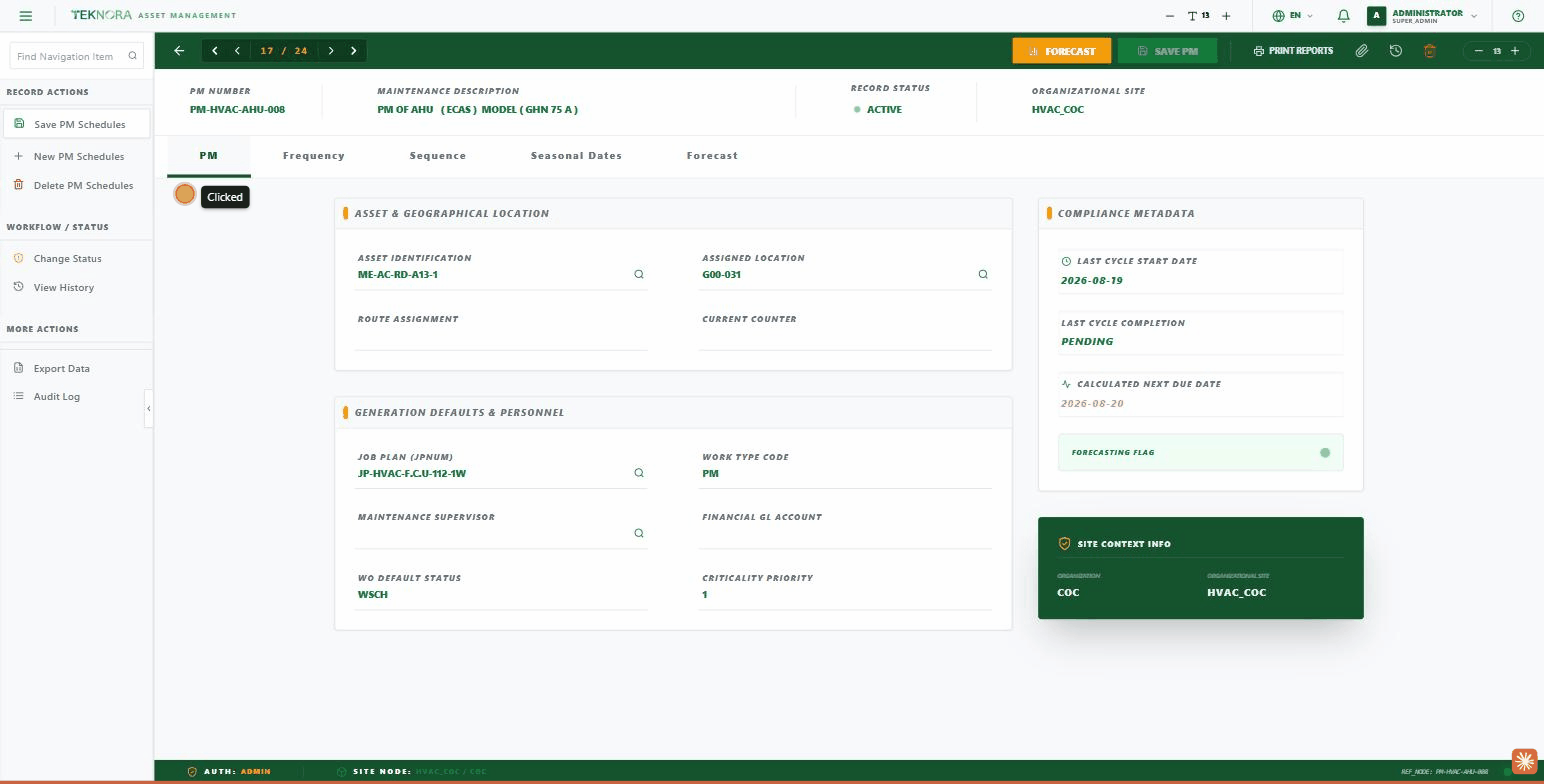
Toolbar
| Button | Function |
|---|---|
| Forecast (orange button) | Generates/refreshes the upcoming work-order projections |
| Save PM | Saves all schedule data |
| Print Reports | Prints maintenance reports |
| History / Attachments / Delete | The usual buttons found on other screens |
PM Tab
- Asset & Geographical Location: asset number, location, route, and current counter.
- Generation Defaults & Personnel: the Job Plan that gets attached to the generated work order automatically, work type, supervisor, GL account, WO default status, and priority.
- Compliance Metadata: last cycle start date, last cycle completion date, the automatically calculated next due date, and the "Forecasting Flag".
- Site Context Info: organization and site.
Frequency Tab
- Time interval: a number + unit (days/weeks/months/years) that determines how often a new work order is generated.
- Target start time: the time of day the new work order's target start is set to.
- Meters table: add one or more meters, each with its own frequency (e.g. every 500 running hours), with a "Next Projection" column showing the expected reading at the moment the work order would be generated.
Sequence Tab
A table for chaining multiple job plans in rotation — each row has a sequence number (Interval) and a Job Plan, letting you build a varying maintenance cycle (e.g. a light service every month and a full overhaul every 6 months, all on the same PM schedule).
Seasonal Dates Tab
Choose which days of the week work orders are allowed to be generated on — check or uncheck any day based on operational needs.
Forecast Tab
A table listing every upcoming projected work order: forecast date, target job plan, estimated cost, status, and the actual work order number (once generated).
Sidebar Actions
- Record Actions: Save / New Schedule / Delete.
- Workflow/Status: Change Status, View History.
- More Actions: Export Data, Audit Log.
Practical Steps
1. Create a new PM schedule
From the directory, click NEW PM RECORD. Set the asset or location, and the default job plan.
2. Configure the frequency
Go to the Frequency tab and set the required time interval, or add meters if the maintenance is usage-based rather than time-based.
3. (Optional) Build a rotating maintenance sequence
If you need alternating maintenance intensities, use the Sequence tab to chain multiple job plans in a set order.
4. Review the forecast
Go to the Forecast tab to confirm work orders will generate on the right dates before activating.
Activation
A PM schedule must be in ACTIVE status to start generating actual work orders — a schedule in DRAFT status generates nothing.
Back to: PM Master Directory ←