Action Script Studio
The Action Script Studio is a full Python code editor (Monaco Editor) dedicated to writing custom business logic that runs automatically inside the system — like converting records, creating new records, or sending alerts.
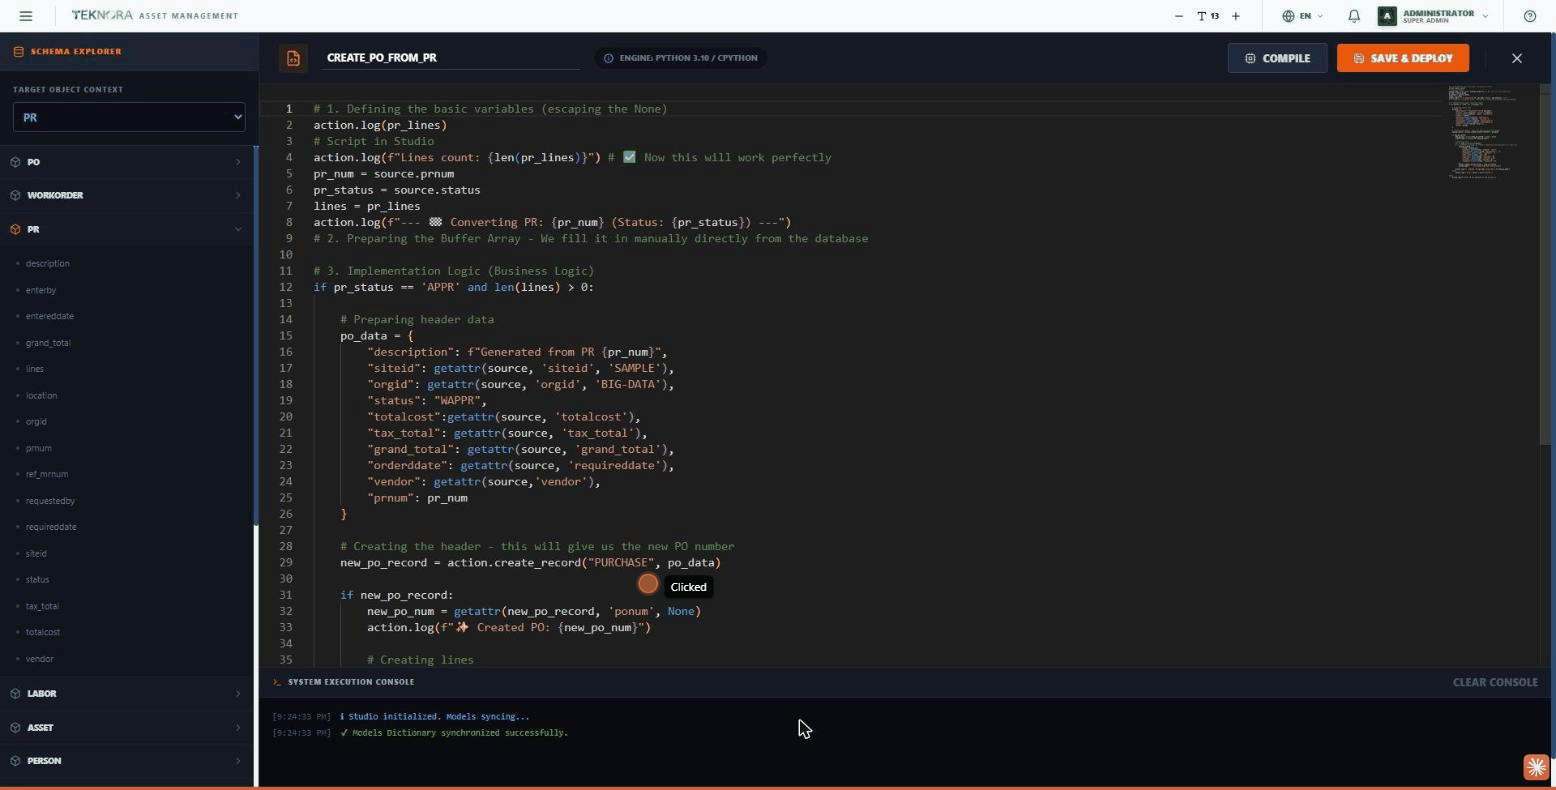
Schema Explorer — Sidebar
- Target Object Context: a dropdown to pick the base model the script operates on (available as the
sourcevariable inside the code). - Model tree: every system model (PO, WORKORDER, PR, LABOR, ASSET, PERSON...) shown as an expandable item, each listing its fields.
- Quick insertion: click any field in the tree to inject it into the editor automatically as
source.field_nameat the cursor position — no need to type it manually.
Toolbar
| Element | Description |
|---|---|
| Script name | A text field for the script's name |
| ENGINE: PYTHON 3.10 / CPYTHON | Informational note about the execution engine |
| COMPILE | Runs a syntax check on the code without saving — the result appears in the console below |
| SAVE & DEPLOY | Saves the script and publishes it so it becomes usable in the Workflow Engine |
| X | Closes the studio and returns to the script list |
Code Editor
A full Python editor with syntax highlighting and smart auto-complete (IntelliSense): type source. and every field of the selected model appears automatically, or type a space and the names of every available model in the system appear.
The Runtime Module (action)
Scripts use two core variables:
source: the record that triggered the script (its data as fields — e.g.source.totalcost).action: a utility module for making real changes, such asaction.create_record("PURCHASE", data)to create a new record, oraction.log("...")to log a message to the console.
System Execution Console
At the bottom of the screen, this shows the result of every Compile run: success messages (in green), errors (in red), and general info (in blue). The CLEAR CONSOLE button clears all messages.
Practical Steps
1. Create a new script
From the script list, click CREATE NEW SCRIPT, choose the target object from the sidebar.
2. Write the logic
Use the Schema Explorer to quickly inject field names, and write the business logic in plain Python.
3. Check and deploy
Click COMPILE to make sure the code has no errors, and check the console below. Once everything checks out, click SAVE & DEPLOY.
4. Link it to the Workflow Engine
Once deployed, the script becomes selectable inside an "Auto Action" node in the Workflow Engine.
Compile before deploying
Always use the COMPILE button before SAVE & DEPLOY — deploying a script with a syntax error can stop an entire workflow process from executing at runtime.
Back to: Action Scripts ←